 Loading... Please wait...
- 800-733-6883
- My Account
*****SORRY! @e're temporarily closed.******
We are working on upgrading and re-launching the site, and will be back online soon!
No Orders will be accepted online or offline during this time. Thanks for understanding!
support@thepartyworks.com
We are working on upgrading and re-launching the site, and will be back online soon!
No Orders will be accepted online or offline during this time. Thanks for understanding!
Pages
- Home
- Party Articles
- Cookie Decorating 101
Categories
- Holidays
- Party Supplies
- Shop By Themes
- Super Mario Brothers
- Mario Kart Wii
- The Octonauts
- Disney Frozen
- Paris Damask
- Star Wars
- Caillou
- Two-Two Train 2nd Birthday
- Avengers Assemble
- Ninja Warrior Party
- Barnyard
- Barnyard 2nd Birthday
- Owl Blossom
- Monster High
- Pink Mod Monkey
- Ballerina Tutu
- Carnival Games
- Candy Shoppe
- 1st Birthday Diva
- 70's Disco
- A New Little Prince
- A Nightmare on Elm Street
- Adventure Time
- Airplane Adventure
- Aladdin
- Alice in Wonderland
- Alligator
- Aloha Birthday
- Anchors Aweigh
- Anchors Aweigh 1st Birthday
- Angry Birds
- Animal Print Leopard
- Another Year of Fabulous
- Arizona Diamondbacks
- Atlanta Hawks
- Austin Powers
- Bachelorette Party
- Baking Bash
- Baltimore Orioles
- Bamboo Weave Luau
- Barbie All Doll'd Up
- Baseball
- Baseball Birthday
- Baseball Fan Birthday
- Baseball Time
- Basketball
- Basketball Birthday
- Basketball Fan
- Batgirl
- Batman
- Batman Dark Knight
- Batman Heroes and Villains
- Beauty and the Beast
- Beetlejuice
- Beyblade
- Big Top
- Birthday Jamboree
- Black and White Check
- Birthday Princess
- Black and White Check Birthday
- Black and White Dots
- Blue and White Dots
- Blue Elephants 1st Birthday
- Blue Polka Dot
- Bob the Builder
- Born to Rock
- Boston Red Sox
- Bowling
- Boy's Lil' Cupcake 1st Birthday
- Boy's Little 1
- Boys Only
- Bubble Guppies
- Camo Gear
- Camouflage
- Candy Land
- Captain America
- Celebrate
- Chevron Black
- Chevron Blue
- Chevron Green
- Chevron Pink
- Chevron Red
- Chevron Yellow
- Chic Wedding Cake
- Chloe's Closet
- Chuggington
- Cincinnati Reds
- Cinderella
- Circus & Carnival
- Cleveland Indians
- Colorado Rockies
- Colorful Commencement Graduation
- Congrats Grad White Graduation
- Construction Pals
- Construction Pals 1st Birthday
- Construction Pals 2nd Birthday
- Cops and Robbers Party
- Cow
- Cowboy
- Cowboy 2nd Birthday
- Curious George
- Cut the Rope
- Dallas Cowboys
- Dallas Mavericks
- DC Comics
- Despicable Me 2
- Detroit Pistons
- Dinosaur Roarrrrrr
- Dinosaur Train
- Dinosaurs
- Director's Cut Hollywood
- Disney 1st Birthday Cars
- Disney 1st Birthday Princess
- Disney Brave
- Disney Cars Dream Party
- Disney Cinderella Sparkle
- Disney Fanciful Princess
- Disney Junior Doc McStuffins
- Disney Junior Sofia the First
- Disney Mickey Fun and Friends
- Disney Mickey Playtime
- Disney Minnie Dream Party
- Disney Monsters U
- Disney Nemo's Coral Reef
- Disney Planes
- Disney Pooh and Pals
- Disney Princess
- Disney Princess Dreams
- Disney Princess Fairytale Friends
- Disney The Little Mermaid Sparkle
- Disney Very Important Princess Dream Party
- Disney's Cars 2
- Disney's Tangled
- Diva Zebra
- Diva Zebra 1st
- Donkey Kong
- Dora and Friends
- Dora's Flower Adventure
- Dr. Seuss ABC
- Easter Tulips
- Edward Scissorhands
- Elegant Prince Damask
- Elegant Princess Damask
- Elegant Princess Damask 1st Birthday
- Elegant Wedding
- Elf
- Elmo's 1st
- Elvis Presley
- Enchanted Unicorn
- Enchanted Unicorn 2nd Birthday
- Everything One Boy
- Everything One Girl
- Faithful Dove Pink Christening
- Falling Flakes
- Farm Animals
- Fashionista
- Fiesta Grande
- Fire Trucks
- Fisher Price Baby Shower
- Flip Flop
- Florida Marlins
- Flutterby Butterflies
- Football
- Football Frenzy
- Football Game Time
- Franklin and Friends
- Friday the 13th
- Frightfully Fancy Halloween
- Froggie Fun
- Froggie Fun 2nd Birthday
- Fun in the Sun
- Garden Fairy
- Georgia Bulldogs
- Get Wicked Cocktail
- Giddy Up Cowboy
- Giraffe
- Giraffe 1st Birthday
- Girl's Lil' Cupcake 1st Birthday
- Girl's Lil' Cupcake 2nd Birthday
- Girl's Little 1
- Girl's Night Out Bachelorette Party
- Girls Only
- Glee
- Goldfish
- Goth Feast
- Grad Celebration Graduation
- Grad Spirit Graduation 2012
- Grad Stars Graduation
- Green and White Dots
- Grill Master BBQ
- Halloween Party
- Halo 3
- Harry Potter
- Hawaiian Girl
- Hello Kitty Balloon Dreams
- Hibiscus
- Hippie Chick
- Hippity Hop
- Hippo Blue
- Hippo Pink
- Hollywood
- Holy Bleep
- Hooray for Elmo
- Horse Power
- Horses
- Houston Astros
- How to Train Your Dragon 2
- Hugs & Stitches
- I Love Lucy
- I Love Puppies 1st Birthday
- Ice Cream Sprinkles
- In The Garden
- Indiana Jones
- Indianapolis Colts
- Itzza Pizza Party
- Jacksonville Jaguars
- Jake and the Neverland Pirates
- Johnny Test
- Johnny Tractor 1st
- Joyful Snowman
- Just Dance
- Just Ducky 1st Birthday
- Kansas City Royals
- Knight
- LadyBug Fancy
- LadyBugs
- LadyBugs: Oh So Sweet
- LadyBugs: Oh So Sweet 2nd Birthday
- Lalaloopsy
- Let Them Eat Cake
- Let's Go Camping
- Lil' Prince 1st
- Lil' Princess 1st Birthday
- Lil' Quarterback 1st Birthday
- Lil' Slugger 1st Birthday
- Little Buccaneer
- Little Dino
- Little Dino 1st Birthday
- Little Man Mustache
- Little Man Mustache 1st Birthday
- Little Mermaid
- Little Spa Party
- Little Sunshine Party
- Littlest Pet Shop
- Look Whoo's 1 Blue
- Look Whoo's 1 Pink
- Los Angeles Angels
- Los Angeles Dodgers
- Luau
- LumberJack
- Madagascar 3
- Madeline
- Martial Arts
- Marvel Super Hero Squad
- Mermaids
- Mermaids Under the Sea
- Michael Jackson
- Michigan State Spartans
- Mickey Mouse Clubhouse
- Mickey's 1st Birthday
- Milwaukee Bucks
- Minnesota Timberwolves
- Minnie Mouse
- Minnie's 1st Birthday
- Missouri Tigers
- Mod Monkey
- Monster Jam
- Monster Jam 3D
- Monster Mania
- Monster Truck
- Mustache Man
- My Little Pony
- My Little Pony Friendship Magic
- NASA
- Nascar Full Throttle
- Nebraska Cornhuskers
- New York Giants
- NFL Drive
- Ni Hao, Kai-Lan
- Nickelodeon Teenage Mutant Ninja Turtles
- Nightmare On Elm Street
- Nighty Night BaZooples
- Nintendo
- Oakland Athletics
- Ocean Preppy Girl
- Oktoberfest
- Olivia
- Orlando Magic
- PAC-MAN and the Ghostly Adventures
- Pajanimals
- Penguins of Madagascar
- Philadelphia Phillies
- Phineas and Ferb
- Phoenix Suns
- Pink and White Dots
- Pink Cowgirl
- Pink Elephants 1st Birthday
- Pink Mustache
- Pink Poodle in Paris
- Pink Poodle in Paris 1st Birthday
- Pink Skull
- Pink Zebra Boutique
- Pink!
- Pinkalicious
- Pinocchio
- Pirate Party
- Pirates
- Pirates of the Caribbean
- Pittsburgh Panthers
- Playful Puppy Blue
- Playful Puppy Blue 1st
- Playful Puppy Pink
- Pocoyo
- Pokemon
- Polka Dot Garden
- Ponies
- Pooh and Friends
- Pooh's 1st Balloon
- Power Rangers Samurai
- Predator
- Pretty Pirates Party
- Prima Ballerina
- Princess Amira
- Princess and the Frog
- Quatrefoil
- rachaelhale Glamour Cats
- rachaelhale Glamour Dogs
- Rainbow
- Rainbow Wishes
- Rapunzel
- Red and White Dots
- Robots 2nd Birthday
- Rock Star
- Rock Star 2nd Birthday
- Rubber Ducky Birthday
- Safari Adventure Party
- Safari Friends 1st
- Safari Party
- San Diego Padres
- Scooby Doo
- Scooby-Doo Mod Mystery
- Sea Life
- Seattle Mariners
- Secret Agent
- Sesame Street
- Sesame Street 1st
- Sesame Street Beginnings 1st Birthday
- Sesame Street Elmo Party
- Sesame Street Party
- Sesame Street Sunny Days
- Sharks
- Shrek
- Shrek Forever After
- Silver Wedding
- Skylanders
- Sleeping Beauty
- Smurfs
- Smurfs 2
- Snoopy
- Snow White
- Soccer Birthday
- Soccer Fan Birthday
- Sock Monkey Blue
- Sock Monkey Pink
- Sock Monkey Red
- Sonic the Hedgehog
- Space Mission
- Special Forces
- Spider Hero Dream Party
- Spider-Man Spider Sense
- Splashin' Pool Party
- Sponge Bob
- SpongeBob
- Sports
- St Patrick's Day
- St. Louis Cardinals
- St. Pat Argyle
- Star Trek
- Strawberry Shortcake
- Sucker Punch
- Summer Splash Luau
- Summer Time Fun
- Sunny Stripe Pink
- Super Stylish
- Super Stylish 16
- Super Why
- Supergirl
- Superhero Comics
- Superman
- Superman: Man of Steel
- Sweet Blessing Blue Baptism & Christening
- Sweet Pea 1st Birthday
- Sweet Safari Blue 1st Birthday
- Sweet Safari Pink 1st Birthday
- Sweet Treats
- Sweet Tweet Bird Blue
- Sweet Tweet Bird Pink
- Sweet-As-Can-Bee
- Sweet-As-Can-Bee 1st Birthday
- Tampa Bay Buccaneers
- Tampa Bay Rays
- Tea For You
- Teenage Mutant Ninja Turtles
- Texas Chainsaw Massacre
- Texas Longhorns
- Thanksgiving Blessing
- The Addams Family
- The Amazing Spider-Man
- THE DOG
- The Jungle Book
- The Legend of Zelda
- The Lion King
- The Lord of the Rings
- The Twilight Saga: Breaking Dawn
- The Twilight Saga: Eclipse
- Thomas the Tank Engine
- Thor: The Mighty Avenger
- Tickety Toc
- Tie Dye Fun
- Tim Burton's The Nightmare Before Christmas
- Tinker Bell
- Tiny Toes Blue Baby Shower
- Tiny Toes Pink Baby Shower
- Tony Hawk's New Boom Boom HuckJam
- Topsy Turvy Tea Party
- Toronto Blue Jays
- Totally 80's
- Totally Fabulous Baby Shower
- Toy Story
- Toy Story 3
- Transformers
- Transformers Revenge of the Fallen
- Tropical Breeze
- Tropical Vacation
- Truck Party
- Turbo
- Two Peas in a Pod Baby Shower
- Uglydoll
- Umbrellaphants Blue Baby Shower
- Umbrellaphants Pink Baby Shower
- Under Construction
- Under the Big Top
- USC Trojans
- Utah Jazz
- V for Vendetta
- Victorious
- Video Games
- Washington Huskies
- Washington Nationals
- Washington Redskins
- Washington Wizards
- Watercolor Leaves
- West Virginia Mountaineers
- Western Bandanarama
- Western Bandanarama Birthday
- Western Lasso Cowgirl
- Whale of Fun
- Whale of Fun 1st Birthday
- White Winter Christmas
- Wild Horses
- Wild Isle Luau
- Willy Wonka
- Winter Friends
- Wisconsin Badgers
- Wizard of Oz
- Wizard of Oz Party
- Wizards of Waverly Place
- Wonder Pets
- Wonder Woman
- Wonderful Wizard of Oz
- Woodland Gnome
- Wow Wow Wubbzy
- WWE
- WWE Party
- X-Men
- Yellow and White Dots
- Yo Gabba Gabba
- Yo Gabba Gabba! 1st Birthday
- Yo Gabba Gabba! 2nd Birthday
- Yo Gabba Gabba! Party
- Zebra
- Zebra Graduation
- Zoology
- Age
- Category
- Bags & Purses
- Balloon Accessories
- Balls
- Banners
- Bean Bags
- Belts
- Blowouts & Noisemakers
- Books, Notepads & Pens
- Boots
- Bubbles
- Cake & Cupcake Stands
- Cake Candles
- Cake Pans
- Cake Toppers
- Candy Party Favors
- Candy Supplies
- Capes
- Centerpieces
- Classic Pinatas
- Confetti
- Cookie Supplies
- Coolers
- Crepe Paper
- Cupcake Liners & Cupcake Wrappers
- Cupcake Picks & Cupcake Rings
- Cupcake Stands
- Cups
- Curling Ribbon
- Decorating Kits
- Decorations
- Dessert Plates
- Dinner Plates
- Empty Favor Boxes
- Face & Body Parts
- Facial Hair
- Fangs & Teeth
- Filled Favor Boxes
- Glasses
- Gloves & Armbands
- Hats
- Hats, Headbands & Masks
- Headbands & Tiaras
- Invitations
- Invitations & Thank Yous
- Jewelry
- Jewelry & Accessories
- Keychains
- Kits
- Latex Balloons
- Makeup
- Masks
- Mylar Balloons
- Name Tags
- Napkins
- Other
- Other Cake & Cupcake
- Other Decorations
- Other Favors & Toys
- Other Tableware
- Pantyhose & Garters
- Pantyhose & Tights
- Pinata Accessories
- Placemats
- Props
- Pull-String Pinatas
- Servingware & Trays
- Shoe Covers
- Shoes
- Signs & Standups
- Solid Color Bowls
- Solid Color Cups
- Solid Color Cutlery
- Solid Color Dessert Plates
- Solid Color Dinner Plates
- Solid Color Forks & Spoons
- Solid Color Napkins
- Solid Color Placemats
- Solid Color Servingware & Trays
- Solid Color Tablecovers
- Souvenir Cups & Bottles
- Sprinkles, Jimmies & Edible Toppings
- Stickers & Tattoos
- Swords & Shields
- T-Shirts & Clothing
- T-Shirts and Clothing
- Tablecovers
- Thank Yous
- Tiaras & Crowns
- Ties & Scarves
- Toys
- Treat Bags
- Tutus & Petticoats
- Undergarments
- Wall, Ceiling & Door Decorations
- Wands
- Weapons
- Wigs
- Wings
- Celebration
- 1st Birthday
- 21st Birthday
- 2nd Birthday
- 30th Birthday
- 40th Birthday
- 4th of July
- 50th Birthday
- 60th Birthday
- Baby Shower
- Bachelorette Party
- Baptism/Christening
- Bar Mitzvah/Bat Mitzvah
- Birthday
- Bridal Shower
- Christmas
- Cinco de Mayo
- Communion/Confirmation
- Dress Up
- Easter
- Everyday
- Football / Superbowl
- Graduation
- Halloween
- Mardi Gras
- Mother's / Father's Day
- New Year's
- Oktoberfest
- Prom
- Retirement
- St. Patrick's Day
- Sweet 16
- Thanksgiving
- Valentine's Day
- Wedding
- Welcome Home
- Gender
- Theme Genre
- Alice in Wonderland
- Angels & Devils
- Animals
- Animals & Insects
- Books
- Bunny Suits
- Cars & Trucks
- Classic
- Clown
- Comics
- Cowboys & Indians
- Disco
- Disney
- Egyptian
- Fairy
- Fairytale & Storybook
- Fiesta
- Flapper
- Flowers
- Food & Beverage
- Gangster
- Geisha
- Gothic
- Grecian & Roman
- Gypsy
- Halloween Movies
- Hippie
- Historical
- Holiday
- Horror
- Humorous
- Irish & Scottish
- Kings & Queens
- Luau
- Luau & Fiesta
- Magic
- Mardi Gras
- Military
- Monsters
- Music
- Ninja
- Occupations
- Other
- Patriotic
- Pimp
- Pirates
- Political
- Prehistoric
- Princess
- Religious
- Renaissance & Medieval
- Santa Suits & Elves
- Sexy
- Skeletons
- Space & Aliens
- Sports
- Steampunk
- Superheroes
- Supplies
- TV & Movies
- Vampires
- Video Games
- Viking
- Vikings
- Werewolf
- Witches
- Shop By Themes
- Cake decorations
- Category
- Cake & Cupcake Stands
- Cake Boards
- Cake Candles
- Cake Decorating Kits & Cupcake Decorating Kits
- Cake Pans
- Cake Toppers
- Cookie Cutters
- Cookie Supplies
- Cupcake Liners & Cupcake Wrappers
- Cupcake Picks & Cupcake Rings
- Cupcake Stands
- Edible Cake Images
- Fondant, Gumpaste & Fondant Tools
- Food Colors
- Food Flavors
- Ingredients
- Other Cake & Cupcake
- Packaging
- Royal Icing Flowers
- Servingware & Trays
- Sprinkles, Jimmies & Edible Toppings
- Sugar Cake Decorations (Dec-ons)
- Utensils & Smallwares
- Celebration
- Shop By Themes
- 1 Love Puppies 1st Birthday
- A New Little Prince
- Abby Cadabby
- Aloha Birthday
- Aloha Luau
- American Idol
- Angry Birds
- Avatar
- Bakugan
- Barbie All Doll'd Up
- Baseball
- Baseball Birthday
- Basketball
- Basketball Birthday
- Batman Dark Knight
- Ben 10 Alien Force
- Bowling
- Bratz
- Butterflies and Dragonflies
- Camo Gear
- Captain America
- Card Night
- Cats & Kittens
- Cinderella Dreamland
- Congrats Grad Blue Graduation
- Congrats Grad Green Graduation
- Congrats Grad Orange Graduation
- Congrats Grad Purple Graduation
- Congrats Grad Red Graduation
- Congrats Grad White Graduation
- Congrats Grad Yellow Graduation
- Construction Pals
- Crayola
- Curious George
- Dinosaurs
- Disney Junior Sofia the First
- Disney Mickey Fun and Friends
- Disney Minnie Dream Party
- Disney Princess Dreams
- Disney Princess Fairytale Friends
- Disney's Cars 2
- Disney's World of Cars
- Dora and Friends
- Dots and Stripes Birthday
- Easter Tulips
- Fairy Princess 1st Birthday
- Faithful Dove Blue
- Faithful Dove Pink
- Falling Flakes
- Fiesta Grande
- Football
- Football Birthday
- Froggie Fun
- Garden Fairy
- Garden Party
- Giddy Up Cowboy
- Gingham Check
- Girl's Lil' Cupcake 1st Birthday
- Girl's Lil' Cupcake 2nd Birthday
- Girl's Little 1
- Girls Only
- Go, Diego, Go!
- Golf
- Goth Feast
- Handy Manny
- Hannah Montana Rock the Stage
- Hanukkah Fun
- Harley Davidson
- Harry Potter Deathly Hallows
- Hello Kitty Balloon Dreams
- High School Musical
- Hooray for Elmo
- Hot Wheels Speed City
- How to Train Your Dragon 2
- I Do Bridal Shower
- I Do Wedding
- I Love Puppies 1st Birthday
- ICarly
- John Deere
- John Deere Pink 1st Birthday
- Joyful Snowman
- Just Dance
- Just Ducky 1st Birthday
- King of the Jungle Baby Shower
- Knight
- Kung Fu Panda 2
- LadyBugs
- Lil' Angel 1st Birthday
- Lil' Rebel 1st Birthday
- Lil' Slugger 1st Birthday
- Little Dino 1st Birthday
- Little Mermaid
- Littlest Pet Shop
- Marvel Super Hero Squad
- Mickey Mouse Clubhouse
- Mickey's 1st Birthday
- Midnight Dreary
- Minnie Mouse
- Mis Quince
- Nascar Full Throttle
- Ni Hao, Kai-Lan
- Nickelodeon Teenage Mutant Ninja Turtles
- Pink Ribbon
- Pirate Party
- Pirates of the Caribbean
- Pokemon
- Pooh and Friends
- Pooh's 1st Balloon
- Pooh's Happy Day
- Power Rangers Jungle Fury
- Princess and the Frog
- Queen of the Jungle
- Robots 2nd Birthday
- Rock Star 2nd Birthday
- Safari Party
- Scooby Doo
- Sea Life
- Sesame Street Beginnings 1st Birthday
- Sesame Street Sunny Days
- Smurfs
- Soccer Birthday
- Special Forces
- Spider-Man Spider Sense
- SpongeBob
- Sports
- Star Wars Clone Wars
- Strawberry Shortcake
- Stripe Style
- Superman
- Sweet Pea Baby Shower
- Sweet Safari Blue 1st Birthday
- Sweet Safari Pink 1st Birthday
- Tea For You
- Teenage Mutant Ninja Turtles
- Thanksgiving Blessing
- The Twilight Saga: Eclipse
- Thomas the Tank Engine
- Thor: The Mighty Avenger
- Tie Dye Fun
- Tinker Bell
- Tinker Bell and the Fairies
- Tom and Jerry
- Topsy Turvy Tea Party
- Toy Story 3
- Transformers Revenge of the Fallen
- Tropical Vacation
- Umbrellaphants Pink Baby Shower
- Under Construction
- Valentine Cupcake
- Western Bandanarama Birthday
- Whale of Fun 1st Birthday
- Willy Wonka
- Winter Friends
- Wizards of Waverly Place
- Wonder Pets
- Wonderful Wizard of Oz
- Wow Wow Wubbzy
- Yo Gabba Gabba
- Yo Gabba Gabba! 2nd Birthday
- Zebra
- Theme Genre
- Category
- Costumes
- Age
- Category
- Celebration
- Gender
- Shop By Themes
- A Nightmare on Elm Street
- Aladdin
- Alice in Wonderland
- Animal Planet
- Austin Powers
- Avatar
- Avengers Assemble
- Batgirl
- Batman
- Beauty and the Beast
- Beetlejuice
- Captain America
- Cinderella
- Crayola
- Dallas Cowboys
- DC Comics
- Despicable Me
- Despicable Me 2
- Disney Frozen
- Disney Junior Sofia the First
- Dora and Friends
- Edward Scissorhands
- Elf
- Elvis Presley
- Fairytale & Storybook
- Friday the 13th
- Ghostbusters
- Halo 3
- Harry Potter
- How to Train Your Dragon
- How to Train Your Dragon 2
- I Love Lucy
- Indiana Jones
- Jake and the Neverland Pirates
- Kings & Queens
- LadyBugs: Oh So Sweet
- Lalaloopsy
- Little Mermaid
- Little Red Riding Hood
- Looney Tunes
- M&M's
- Marilyn Monroe
- Mermaids Under the Sea
- Michael Jackson
- Mickey Mouse Clubhouse
- Minnie Mouse
- Monster High
- Monsters Inc.
- NASA
- Nickelodeon Teenage Mutant Ninja Turtles
- Nightmare On Elm Street
- Ninja Warrior Party
- Pac-Man
- Peter Pan
- Pirates of the Caribbean
- Power Rangers
- Predator
- Rainbow
- Rapunzel
- Reno 911
- Scooby Doo
- Sesame Street
- Shrek
- Skylanders
- Sleeping Beauty
- Smurfs
- Snow White
- Spiderman
- SpongeBob
- Star Trek
- Star Wars
- Sucker Punch
- Super Mario Brothers
- Supergirl
- Superman
- Teenage Mutant Ninja Turtles
- The Addams Family
- The Flintstones
- The Incredibles
- The Lord of the Rings
- The Munsters
- The Nightmare Before Christmas
- The Pirates of the Caribbean
- Tim Burton's The Nightmare Before Christmas
- Tinker Bell
- Tom and Jerry
- Toy Story
- Transformers
- Universal Studios Monsters
- V for Vendetta
- Wizard of Oz
- Wonder Woman
- Zorro
- Theme Genre
- Angels & Devils
- Animals
- Animals & Insects
- Bunny Suits
- Classic
- Clown
- Comics
- Couples
- Cowboys & Indians
- Disco
- Disney
- Egyptian
- Fairy
- Fairytale & Storybook
- Fiesta
- Flapper
- Food & Beverage
- Gangster
- Ghosts
- Gothic
- Grecian & Roman
- Gypsy
- Halloween Movies
- Hippie
- Historical
- Holiday
- Horror
- Humorous
- Irish & Scottish
- Kings & Queens
- Luau
- Magic
- Mardi Gras
- Mascots
- Military
- Monsters
- Music
- Ninja
- Occupations
- Other
- Patriotic
- Pimp
- Pirates
- Plus Size
- Prehistoric
- Princess
- Pumpkins
- Religious
- Renaissance & Medieval
- Santa Suits & Elves
- Sexy
- Skeletons
- Space & Aliens
- Sports
- Steampunk
- Superheroes
- Supplies
- TV & Movies
- Vampires
- Video Games
- Viking
- Werewolf
- Witches
Cookie Decorating 101
Posted on Feb 1st 2016
|
How To Decorate | |||
|
S |
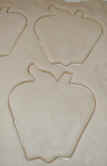 Cutting The Dough Roll out your cookie dough. Then using a cookie cutter cut out the shapes. |
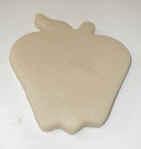 Removing The Impression Remove the cookie impression from the dough. |
S |
|
S |
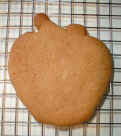 Baked Cookie Bake your cookies according to your recipes directions and let cool completely on a rack before decorating. |
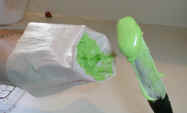 Filling The Bag Fill a decorating bag about a 1/3 full with Royal Icing. Tint with desired color or leave white. Fit with tip # 2 or 3 (The Royal icing needs to be thick enough to hold it's shape when piped). |
S |
|
S |
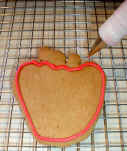 Piping On The Seam Squeeze, while outlining the edge of the cookie. After outlining the entire edge, stop at the edge of the beginning line, touch and lift (This is called the dam or seam.) |
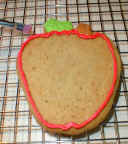 Sealing The Dam / Seam To seal the seam, dip a paintbrush in some water. Dab the paintbrush on a paper towel. Gently touch the seam. This will cause it to disappear. Allow the outline to dry. |
S |
|
S |
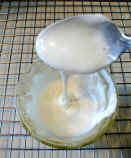 Thinning The Icing Take the icing that you will use to fill in the center of your outline, add a little water to it. It needs to have a streaming not runny consistency. |
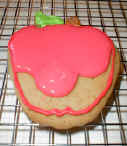 Filling The Outline In Fill the outline in with the thinned icing, using a spoon or squeeze bottle. Be generous With a spoon gently push the icing into the corners and at the points. |
S |
|
S |
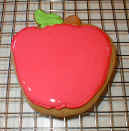 Ready To Dry Allow the icing to dry for at least 2 hours. After your cookie has had time to dry, you can add additional decorations or writing on your creation. |
Cookie Cutters | |


